Updated November 9, 2023
Respiratory Virus Testing
Cleveland Clinic Laboratories offers several respiratory testing services to healthcare organizations & providers.
SARS-CoV-2, influenza A/B, and respiratory syncytial virus (RSV) testing is available for the qualitative detection of these viruses in respiratory specimens from individuals with appropriate signs, symptoms, and risk factors.
All three viruses are expected to be in circulation during the 2023-2024 respiratory virus season.
RSV Resources
Test Overview
Test Name
Turnaround Time
24 hours from the time of receipt by the laboratory*
Testing is performed 24 hours a day, 7 days a week
Specimen Requirements – Upper Respiratory
Type:
(1) Nasopharyngeal (NP) Swab – preferred
Volume:
3 mL
Specimen Container:
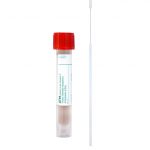
Universal Transport Media (UTM)

Accepted Alternatives
Type:
• (1) Nasopharyngeal (NP) swab
• (1) Nasal (anterior nares) swab
Volume:
Swab
Transport Media:
• Universal Transport Media (UTM)
• eSwab
• Saline (sterile)
• Viral Transport Media (VTM), including M4RT, M5, or M6
Specimen Requirements – Lower Respiratory
Type:
• Aspirate, tracheal
• Bronchoalveolar Lavage (BAL)
• Sputum
Volume:
1 mL
Transport Container:
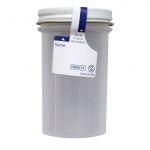
Sterile container

Transport Temperature
Refrigerated; transport to the laboratories on cold packs or wet ice.
Stability
Ambient:
Unacceptable
Refrigerated (2-8ºC):
72 hours
Frozen:
Up to 30 days
Rejection Criteria
Ready to Place an Order?
Download and complete a Respiratory Virus Testing Requisition (required).
Need to Set Up an Account?
Request support from a regional Account Manager or contact Client Services for general inquiries.
Specimen Collection Instructions
You will need:
• Personal protective equipment (PPE)
• (1) tube of transport medium
– Universal Transport Media (UTM)
– Viral Transport Media (VTM)
– Saline solution
• (1) swab
• Patient identification labels
Before you begin:
• Confirm the patient’s name and date of birth.
• Wash your hands, then put on personal protective equipment, including gloves.
Nasopharyngeal (NP) Swabs
Step 1:
Carefully remove the swab from the packaging without touching the tip.
Step 2a – for nasopharyngeal (NP) swabs:
– Gently insert the NP swab along the nasal septum just above the floor of the passage to the nasopharynx until resistance is met.
– Rotate the swab gently against the nasopharyngeal mucosa for 10 – 15 seconds, then remove.
Step 3:
Remove the cap from the tube, then insert the swab all the way to the bottom of the vial.
Step 4:
While holding the tube away from your face, bend the swab in the vial at a 180-degree angle to break at the marked breakpoint.
Step 5:
Close the tube tightly. If possible, wrap the cap with Parafilm.
Step 6:
Label specimen with the printed label or write the patient’s first & last name, date of birth, and the date, time, and site of collection (e.g., NP) on the tube.
Step 7:
Double-bag the specimen, place on wet ice, then refrigerate.
Step 8:
Complete a Coronavirus 2019 (COVID) Test Requisition.
Step 9:
Place the completed requisition in the pocket of the specimen bag.
Step 10:
For the fastest turnaround time, deliver the specimen directly to the Main Campus LL Building Specimen Receiving Area:
Cleveland Clinic Laboratories
10300 Carnegie Avenue
Cleveland, OH 44106
Nasal (Anterior Nares) Swabs
Specimen Collection:

Step 1:Carefully remove the swab from the packaging without touching the tip.

Step 2:
Position the patient’s head slightly back, then insert the swab into their LEFT nostril (less than one inch) and gently push until a slight resistance is met.

Step 3:
Rotate the swab against the inside of the patient’s nostril four times for 10-15 seconds.

Step 4:
Remove the swab, then repeat Steps 2 & 3 in the RIGHT nostril with the same swab.
Remove the swab from the patient’s nose when finished.
Preparing for Transport:

Step 5:
While holding the swab, open the tube and set the cap down with the threads facing up.
Insert the swab into the tube until the breakpoint is level with the tube opening.

Step 6:
While holding the tube away from your face, bend the swab until it snaps at the break point.

Step 7:
After discarding the remaining swab shaft into an approved disposal container, screw the cap back onto the tube.
Apply the test label or write the patient’s information onto the tube.

Step 8:
Place the specimen into a biohazard bag, then insert any lab paperwork into the outside pouch.
If you have any questions, please contact your CCL Account Manager or Client Services for assistance.
